

How To Draw A Line In Powerpoint

"Hand-fatigued" or sketched mode graphics give the appearance of beingness drawn with a pencil or marker. A presentation in a manus-fatigued style might be used in an breezy setting; some believe that this style is generally more engaging than the usual "slicker" appearance. On the other mitt, information technology may not be suitable for your pitch deck or a sales presentation.
NOTE: You can acquire hand-fatigued graphics on the web or you tin can apply other tools to create them, including a pencil, paper and a scanner. Using the PowerPoint techniques described here may be more convenient, consistent and you lot don't have to be an creative person.
Even if you don't want a complete hand-fatigued presentation, y'all might want to add a hand-fatigued graphic to an otherwise formal presentation – similar this:

Or you might want to highlight a item with a hand-drawn mark:

This mail will explore techniques for creating informal "sketched" graphics and presentations, including a recently introduced choice that is plain intended to aid in the cosmos of objects that appear to be hand-drawn.
Beginning, some caveats:
- Even though nosotros want an breezy "look," we don't want a sloppy appearance – the usual guidelines about legibility, contrast and stylistic consistency utilise.
- In the same vein, take your usual care with alignment, spacing and overall limerick. Small inconsistencies in size and alignment are ok.
- Getting a elementary appearance is not unproblematic – these methods can take more effort than your usual procedure.
- The Sketched fashion implementation has some bug; this adds unnecessary difficulty to this project.
"Sketched Style"
My version of PowerPoint includes a Line Format option called Sketched style. When applied to a Shape with an outline, the upshot modifies the outline as shown hither; three options are provided:

Here are a few more than examples:

- Using a relatively heavy outline may assistance the effect.
- These examples all utilise the Scribble selection.
- Setting the Line Format/Join type to Bevel also helps (makes the corners less pointy).
- Yellow adjustment handles work properly (the 2d row shows adjusted versions).
- These are all unfilled objects; more than about that later.
Oddly, Sketched fashion is non bachelor for a number of Line types – specifically, those outlined in ruddy below:

Annoyingly, the simple straight line (with or without arrows) is missing. You tin can overcome this by starting with the Freeform tool, clicking at the starting indicate, moving the cursor to the finish point, and double clicking. Although the result looks like a Line, information technology own't; it's a Freeform. Y'all can apply the Sketched effect and even an pointer (the Open up Arrow looks all-time):

Of course, Sketched does not apply to a Shape without an outline. However, you can set an outline color to match the fill to become the effect of a hand-drawn object without an outline.
If you utilise the Line format/Sketched upshot to a filled object, you can often get a result you may non like because the shape of the Fill does not match the Outline; here are examples (the line weight is lighter for clarity):

You tin can assure that the Make full shape matches the Sketch upshot outline by adding the Fill after the Sketch consequence:

Annotation that, if you Copy/Paste or Indistinguishable a Shape with a Sketched effect Outline, the exact Outline will exist reproduced. This not desirable for the paw-drawn style since you lot want each object to exist slightly different. The duplicated Outline will persist, fifty-fifty if you remove it and apply the style again (!). To create similar hand-drawn Shapes with dissimilar Outlines, you lot have to duplicate the original Shape and utilise Sketched furnishings separately to each duplicate.
By the fashion, if you utilize Sketched consequence to a Group of similar objects (e.g., Rectangles), all the outlines volition be the aforementioned. Once more, this is ordinarily not desirable.
Hither are some examples of objects created in earlier posts with the Sketched effect added:

The shopping cart is made generally from lines (Freeforms); the wheels (Ovals) have an outline that matches the Make full color.
WARNING: If yous define the Default shape with Sketched outcome outlines, it will no longer be possible to create Freeforms. This is a bug and no doubt will be fixed sometime in the next century. ![]()
Line effects like dashes can exist applied to Sketched lines:

The Compound consequence and some of the Dash options may not quite work equally hand-drawn strokes.
Other Line options can be used to tune the hand-fatigued style:

The Round Cap and Join options, equally well as the Apartment Cap and Bevel Bring together seem to piece of work well with the Sketched style.
The Sketched upshot cannot be applied straight to Smart Fine art or Charts but they can be converted to Shapes and Sketched applied to the results. Hither are a couple of examples:

NOTE: To convert a Nautical chart to Shapes, Re-create the Nautical chart and Paste Special as a EMF object. Then Ungroup the issue to get individual Shapes. Notwithstanding, the results are sometimes non as useful as they might be.
Other "Hand-Drawing" Techniques
In addition to applying Sketched to standard shapes, there are ways to draw shapes and lines directly. This may be useful when y'all need a hand-fatigued shape that's not in the standard repertoire.
NOTE: My mail service on Shapes and More than Shapes describes several methods for acquiring non-standard shapes, including merging existing shapes, acquiring online vector graphics and "vectorizing" images.
Three of the options in the Lines pane allow y'all to depict directly. Here'south my attempt to depict loops using these options:

The Curve is drawn by clicking at the starting bespeak, moving the cursor and clicking at additional points, and double clicking the end point. The two Freeform shapes were fatigued with a continuous motion – click, hold the push button downwardly and move the cursor along the desired path, double click at the end point.
If you want to match the Sketch manner, irregular but smoothen, the Curve selection seems best. (Or, you may be able to produce smoother results than I can with the continuously drawn Freeform.)
You may detect information technology difficult to go the result you want the first fourth dimension with the Curve. Hither are a couple of means to "amend" a Curve:
- Describe the Bend continuously as higher up and point-edit the upshot. Here's an example where the initial bend is adjusted using Edit Points:

Note: You lot can find tutorials on point-editing on the web; here'due south a place to showtime.
- Depict a Freeform Shape point-by-point; this arroyo makes information technology easier to command the shape but information technology will produce directly lines and sharp corners. To fix this, betoken edit the results and modify the segments from Straight to Curved:

Some other way to manus-draw shapes is to use "Ink." In the Draw ribbon, you will find drawing tool options (eastward.m., Pencil) and color and point size options. I drew these objects using the tools:

These are pretty rough, fifty-fifty for a hand-drawn wait. I find it difficult to describe relatively smooth Ink strokes using a mouse – a touchscreen or drawing pad might work better.
This video mail on "Inking in PowerPoint" suggests using a graphic object equally a template for an Inked drawing – that is, "tracing" the template to brand free-hand cartoon easier. I also find that if I kickoff with a big drawing and so reduce it, the flaws are less obvious. Here are couple of examples:

Here's some other example based on one of the PowerPoint Icons. I used the Eraser and several strokes to draw the "large" bird – the reduced version has a narrower stroke width – not too bad:

By the way, Ink strokes are non Shapes or Lines – they can't be point-edited or Filled in the usual mode and effects (e.g., Shadow) are not available. You can only modify the stroke width and color (left click and select Edit Ink).
Fills
The Sketch effect, and the other methods I just described, only operate on Lines. The standard "solid" Fills don't look bad in the examples only yous may desire to spend a little more effort to get a more than hand-drawn look. Here are some possibilities, in social club of complexity.
Among the other built-in Fill up options, Blueprint, Gradient and some of the Texture choices are too regular. Here are some of the more irregular Texture examples that can piece of work (I have recolored these to fit my Color Scheme):

Y'all tin can, of course, acquire textures on the web (use search terms like marker, pencil, castor, watercolor, etc., to go the sketched await). Here are some examples:
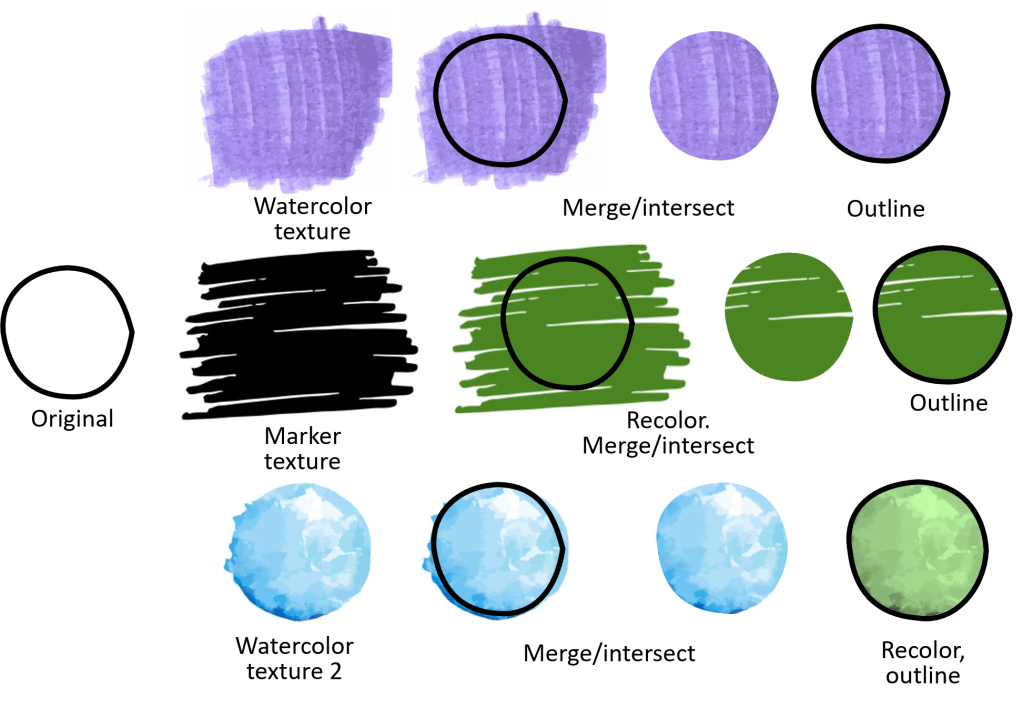
I used Merge/Intersect to "make full" the shape – I think this is easier than Fill/Picture. See this mail for details.
Some other possibility is to apply Creative Furnishings to the fill. This requires that the object be converted to a Moving picture (Copy/Paste special/PNG) – however, this makes the effect difficult to edit. Run across my comprehensive mail on Artistic Effects for details.
Hither are some examples:

Since I did not desire to include the Outline in the PNG where it would be effected past the Artistic consequence, I made the outline and the fill the same color before converting. The Pencil grayscale issue is always grayness and required recoloring. I overlayed the original outline on the PNG to complete the outcome.
These techniques neatly fill the outline; if you desire a more coincidental effect, you can paw-describe (!) the fill up. Here are some examples:

The first example is created equally a Bend using the click-past-click technique (there are actually two Curves). I "scribbled" these dorsum and forth roughly within the outline and then increased the line width for a better fill up.
The two Draw examples are fatigued in a circular fashion to lucifer the outline; the Pencil version may be the most effective. By the style, this would be easier if the Draw tools immune a wider tip.
Please don't mix these methods in your presentation – employ a consequent fill up type and outline weight. Using the same outline color throughout is preferable but at that place may be exceptions. Of course, colors volition be selected from your Colour scheme, won't they?
Text
At that place are "hand-printed" fonts available that are consistent with the "paw-drawn" mode. Here are a few examples of fonts that are likely to be installed in your Windows environment:

Notation: When a PowerPoint file contains fonts that are non in its electric current surroundings (due east.g., when the file is shared or loaded onto a "strange" computer), PowerPoint will silently substitute a similar font. This can cause layout problems. Since the fonts to a higher place are likely to be installed in any Windows surround, they are "safe." Come across this post and the referenced posts for more details.
Manus-fatigued fonts are also available on-line. Hither are a couple of (costless) examples from fontsquirrel.com:

Here are some notes on selecting fonts:
- Fonts that mimic script or cursive writing are usually besides regular for this application.
- Avoid specialty fonts; even Comic Sans may have unwanted associations.
- The "stroke weight" should be consistent with line weights; Bradley Hand may be too light, for example, although Assuming helps.
- Make certain that your font is hands read – for example, Daniel might be a little difficult.
For what it'due south worth, you tin can effectively apply the Sketched effect to a font by first converting the text to a Shape (Freeform) using Intersect. Of grade, the result is a Shape and tin can't be edited every bit text. Here are a couple of examples:

Later converting the text to a Shape, the Fill is removed and an Outline is added. Then, the Sketched style is applied. However, if the Outline is removed and Fill up added at this point, the Sketched issue seems to disappear. Then, the Line is retained at 0 pt width.
Enlarging these results reveals some mismatches between Fill and Outline – this may bother you lot:

I you are using manus-drawn text sparingly, you may desire to draw text using Ink. Using real Text as a template and making the initial drawing at a large size may help, every bit for drawing shapes. Here are a couple of examples:

The Ink Ruler was used to align the bottom of the characters in the first instance.
Photos
Don't be tempted to employ Artistic Effects to brand photos in your hand-drawn presentation look similar pencil sketches or other art media – this will issue in images that are far besides artistic for this style.
Arranging Pictures informally and making them await like individual photos seems to work with the informal manner:

Here the Pictures are at slight angles and overlap. The preset Picture Fashion Uncomplicated frame – White has been applied to the Pictures.
Alarm: Setting a Moving picture border to Sketched consequence makes the pic disappear. Another bug ![]() .
.
Backgrounds
Y'all can notice various lined or graph paper textures or backgrounds on the web (for this application, a vector graphic may not be necessary). You can use them as part of a single graphic (similar the Top slide to a higher place) or as the Background in your Theme for a mitt-drawn presentation. Here's an example:

Some of the available lined paper textures feature wrinkles and aging – these are probably not appropriate.
Animation and Transitions
Readers of this web log will know that I am an advocate of animation in presentations as a way to provide data in easily digested chunks and to keep the audience's attention in a world of motion. I would manifestly like to employ these techniques in paw-drawn manner.
The "natural" mode to breathing hand-drawn manner is to actually mimic the cartoon operations – stroke by stroke, following the lines of the drawing. PowerPoint has not provided this kind of animation until recently; yet, it is bachelor only for Ink objects – see Replay and Rewind on the Blitheness Ribbon.
If you lot tin can manage to produce acceptable Ink drawings, this is the virtually "natural" way to animate manus-drawn objects and text.
Here are some examples of blithe Ink:
The starting time two examples each consist of a single stroke. The text examples and the bird consist of several strokes, Grouped together before applying the blitheness. Each group animation shows up as a single detail in the Animation Pane. The order of animation seems to reflect the original drawing society – my concluding minute "correction" to the bird's beak is conspicuously shown.
But, as y'all can see, there is an fault in the order of blitheness in the commencement text example. I'1000 not sure how this happened only I think I made an fault in Grouping the strokes. The only way I could right this was to ungroup the strokes, select them and apply Replay. Each stroke blitheness at present shows up as a split up detail on the Animation Pane and the order and timing tin exist adjusted. Here's the original and corrected text blitheness:
If you lot oasis't the fourth dimension or skill to use Ink, here are some animations of ordinary text and Sketched shapes that "almost" work:
Hither'south the annotated Animation Pane and some notes for this case:

- The rectangles actually consist of a separate outline and filled rectangle. I used an outline that is heavy plenty to hide the inconsistencies between the Sketched consequence outline and the "unsketched" fill up object (recolored Cork texture):

- The outline animations are Bike/1 spoke. This provides a pretty disarming "drawing" result for most elementary Shapes.
- The fill animations are Strips/Correct down. This doesn't mimic the way the fill might be drawn but information technology, at least, suggests a cartoon movement.
- Accurately animating the press of the text stroke by stroke is not practical. I used the Wheel/1 spoke/By letter (with 100% delay) blitheness to suggest the motion; although this is not an accurate recreation of drawing, you might find it acceptable, especially when it is quick (0.ii sec per grapheme).
- If y'all don't like the Wheel animation for text, utilise Announced or Fade with the By letter option.
- The arrow is in 2 parts; each is animated with Wipe separately (Wipe/From acme for the arrow head).
- Each animation is done quickly both to avoid delay and to mask imperfections.
One way to introduce photos is "toss" them into view; here's an example using the Wheel text technique and Fly in animations for the photos.
Adding a Spin of ninety degrees or less to the Wing in motion will add to the "toss" effect.
You lot may recollect this is too distracting – use simple Fades or Wipes instead.
The slide Transitions that give the result of moving from one sheet of paper to the next may be appropriate for the manus-drawn style. Hither's an example using the Cover/From Correct Transition:
Hither's a version using a more elaborate transition (Peel Off):
Recommendations
- Don't sacrifice clarity and consistency for the hand-fatigued look.
- Don't pick fonts and other furnishings that may exist difficult to read or are distracting.
- If you're in a hurry, use ordinary fills or the built-in textures for make full. Using acquired textures is a niggling more fourth dimension-consuming. The other methods I've demonstrated may take besides long.
- Utilize a single font, Line and Fill fashion. That is, use a consequent Sketched consequence, line weight and color and a consistent fill technique.
- Pay attention to layout and alignment and avoid overcrowding.
- Use a Color Scheme and stick to it.
- Some of the animations and transitions I've shown you may be likewise elaborate; use fades, wipes, etc., if y'all desire a simpler await.
- Using Sketched result may be more than complicated than you recollect because of bugs and poor implementation choices.
- Y'all can utilise Ink to create hand-fatigued shapes and text and animate them stroke by stroke. However, this is more hard than using Sketch event and special fonts unless you are simply using limited hand-drawn effects.
If y'all want to encounter more than details, use the link beneath to download a costless "source" PowerPoint file containing these projects:
See this page for more on downloading files.
If you lot have questions, praise or complaints, please add a annotate below. If y'all appreciate my efforts, liking or post-obit this blog might be a good thought.
If there are other topics you lot would like to run into in this blog, please leave a comment or click on "Contact the author" in the imprint higher up to email me.

Source: https://pptcrafter.wordpress.com/2019/09/24/hand-drawn-style-in-powerpoint/
Posted by: blanknothad1946.blogspot.com
0 Response to "How To Draw A Line In Powerpoint"
Post a Comment